Training and Tutorials
This section will have numerous materials on training for the various services we offer. Please contact us for questions or suggestions on areas of training you would like to see here!
How do I setup Blue Net Hosted Email on my android?
1. From the Applications menu, select Email. This application may be named Mail on some versions of Android.
2. Type your full email address, for example joe.user@mycompany.com, and your password, and then select “Next”.
3. Select Exchange account. This option may be named Exchange ActiveSync on some versions of Android.
4. Enter the following account information and select “Next”.
- DomainUsername: Type your full email address in this box. If Domain and Username are separate text boxes in your version of Android, leave the Domain box empty and type your full email address in the Username box. On some versions of Android, you must use the domainusername format. For example, if your email address is joe.user@mycompany.com, type mycompany.com joe.user@mycompany.com. Your username is your full email address.
- Password: Use the password that you use to access your account.
- Exchange Server: webmail.tdonline.com.
5. As soon as your phone verifies the server settings, the Account Options screen displays. The options available depend on the version of Android on your device. The options may include the following:
- Email Checking Frequency: The default value is Automatic (push). When you select this option, email messages will be sent to your phone as they arrive. We recommend only selecting this option if you have an unlimited data plan.
- Amount to Synchronize: This is the amount of mail you want to keep on your mobile phone. You can choose from several length options, including One day, Three days, and One week.
- Notify Me When Email Arrives: If you select this option, your mobile phone will notify you when you receive a new email message.
- Sync Contacts from This Account: If you select this option, your contacts will be synchronized between your phone and your account.
6. Select “Next” then type a name for this account and the name you want displayed when you send e-mail to others. Select “Done” to complete the email setup and start using your account. You may need to wait 10 to 15 minutes after you set up your account before you can send or receive e-mail.
How do I set up my apple device with a Hosted Blue Net email account?
Blue Net Hosted Email Information:
Email: joe.user@yourdomain.com
Domain: leave blank
User Name: your email address
Password: your password
Description: however best to describe your email account
With Email Address, Username, and Password the apple device should auto-discover. If it doesn’t, the screen above will display. The information from the previous screen will auto-fill simply add Server: webmail.tdonline.com. If everything has been entered correctly check marks will appear to the right next to each field then you’ll move on to the next screen.
MailProtector
MailProtector is our comprehensive hosted anti-spam and email security service. It ensures the optimal filtering of unwanted or harmful messages, while also providing customers with assurance that they can continue to access and respond to email even when their own email infrastructure is offline. The solution is easily customized and extremely easy to maintain.
Manage your email Filter at:
http://emailsecurity.bluenetcloud.com/
Username: your email address
Password: same as you use to log into your PC.

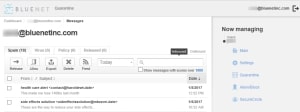
The default (Quarantine) screen will show any messages that have been caught in the spam filter. From here you may release, allow (whitelist), export, or delete the message(s) by clicking in the checkbox next to the message and then clicking on one of the buttons above.
On the right side of the screen, there will be links for additional settings.
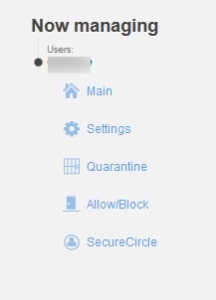
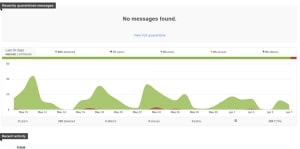
The “Main” screen shows a graph of your mail traffic for the last 30 days.
The “Settings” screen gives you additional options.
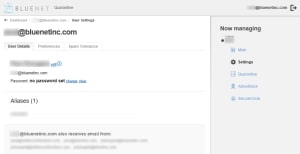
Spam Tolerance defaults to "Normal" 200/1000 setting. The higher the setting the harder it is for Spam to get through, but also the more likely for a false-positive to block desirable messages. 99% of our users leave the tolerance to "Normal"
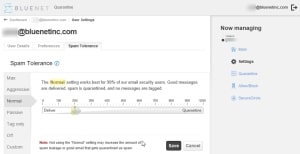
Spam Tolerance: Leave Anti-Spam Aggressiveness at Normal
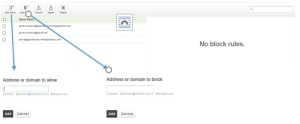
The “Allow/Block” screen allows you to create, allow, or block rules for individual email addresses or domains.
If you can't find answers in to your questions in the above tutorial, please reach out to our support team.
Launch Microsoft Outlook from the start menu or desktop icon. If this is the first time launching Outlook, the wizard will start automatically.
If Outlook has already been configured for another email account, from within Outlook select File.
Add Account:
Enter your Name, email address, and password.
Outlook will query your account information. If your DNS has been configured correctly Outlook will auto-discover the email server settings.
Check "Don’t ask me about this website again."
Upon successful completion of the Add New Account wizard, click.
If autodiscover did NOT automatically configure your e-mail server settings it is most likely because your DNS was not properly configured. You can MANUALLY configure your email account using the following information:
Check the "Manually configure server settings."
Select "Microsoft Exchange or compatible service".
Server: EDC-CAS01.tdonline.com
User Name: joe.user@yourdomain.com
Click More Settings.
Click the "Connection" tab.
Check the "Connect to Microsoft Exchange using HTTP" box.
Click Exchange Proxy Settings.
Use this URL to connect to my proxy server for Exchange: webmail.tdonline.com.
Check Connect using SSL only.
Check "Only connect to proxy servers that have this principal name in their certificate" msstd:webmail.tdonline.com.
Check both boxes: On fast networks, connect using HTTP first, then connect using TCP/IP.
On slow networks, connect using HTTP first, then connect using TCP/IP.
Change Proxy authentication settings to "Basic Authentication."
Click again to close the "More Settings…" Page. You will be prompted.